Converting CSS to SASS
Install
- Open terminal and change directory to the project folder
- Install Sass with the command line below
$npm install sass - Check if you can find the version info of sass on package.json>>"dependencies"
"dependencies": { "@testing-library/jest-dom": "^5.16.4", "@testing-library/react": "^13.2.0", "@testing-library/user-event": "^13.5.0", "react": "^18.1.0", "react-dom": "^18.1.0", "react-router-dom": "^6.3.0", "react-scripts": "5.0.1", "sass": "^1.51.0", //you should see the info here "web-vitals": "^2.1.4" }, - Change the extension of linked css file to ".scss"
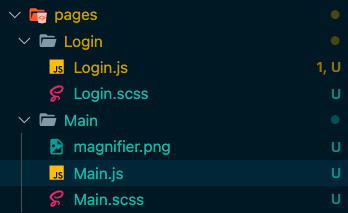
//from
import "./Login.css";
import "./Main.css";

//to
import "./Login.scss";
import "./Main.scss";
Converting
Variables
Making variables is a way to store information that you want to reuse throughout your stylesheet. Store things like colours, fonts, or any CSS values you think you are going to reuse. You can use $ symbol to make a variable.
//CSS
.login-container {
    border: 1px solid lightgrey;
    background-color: #fff;
    margin: 40px auto 0;
}

.login-input {
    display: block;
    box-sizing: border-box;
    border: 1px solid lightgrey;
    border-radius: 3px;
    box-shadow: 0 1px #fff;
}

//Sass
$primary-white: #fff;
$border: lightgrey;

.login-container {
    border: 1px solid $border;
    background-color: $primary-white;
    margin: 40px auto 0;
}

.login-input {
    display: block;
    box-sizing: border-box;
    border: 1px solid $border;
    border-radius: 3px;
    box-shadow: 0 1px $primary-white;
}
Nesting
Unlike HTML, CSS doesn't have a hierarchy. However, Sass lets you nest your CSS selectors in a way that HTML does.
//CSS
.login-container {
    border: 1px solid lightgrey;
    background-color: #fff;
    margin: 40px auto 0;
}

.login-container h1 {
    text-align: center;
    margin: 50px 0 50px 0;
    background-color: #fff;
}

//Sass
$primary-white: #fff;
$border: lightgrey;

.login-container {
    border: 1px solid $border;
    background-color: $primary-white;
    margin: 40px auto 0;
   h1 {
       text-align: center;
       margin: 50px 0 50px 0;
       background-color: $primary-white;
   }
}
Mixins
Mixins let you make groups of CSS declarations that you want to reuse throughout your page. To create a mixin, use @mixin directive and give it a name. You can also pass in values to make your mixing more flexible. After you create the mixin, use it as a CSS declaration starting with @include followed by the name of the mixin.
//CSS
.info {
  background: DarkGray;
  box-shadow: 0 0 1px rgba(169, 169, 169, 0.25);
  color: #fff;
}

.alert {
  background: DarkRed;
  box-shadow: 0 0 1px rgba(139, 0, 0, 0.25);
  color: #fff;
}

.success {
  background: DarkGreen;
  box-shadow: 0 0 1px rgba(0, 100, 0, 0.25);
  color: #fff;
}

//Sass
@mixin theme($theme: DarkGray) {
  background: $theme;
  box-shadow: 0 0 1px rgba($theme, .25);
  color: #fff;
}

.info {
  @include theme;
}
.alert {
  @include theme($theme: DarkRed);
}
.success {
  @include theme($theme: DarkGreen);
}
Operators
Sometimes you want to do math in your css. Sass offers various math operators such as +, -, *, %, and math.div(). Operations in Sass can help us doing like take pixel values and convert them to percentages easily.
//CSS
.container {
  display: flex;
}

article[role="main"] {
  width: 62.5%;
}

aside[role="complementary"] {
  width: 31.25%;
  margin-left: auto;
}

//Sass
@use "sass:math";

.container {
  display: flex;
}

article[role="main"] {
  width: math.div(600px, 960px) * 100%;
}

aside[role="complementary"] {
  width: math.div(300px, 960px) * 100%;
  margin-left: auto;
}
Reference
https://sass-lang.com/guide